About Me Tutorials Contact Me Via Social Media! Visit Brittany's Joy Store
Showing posts with label fashion. Show all posts

Friday, January 18, 2013

cap-toe shoes // diy

DIY cap toe shoes
Today's DIY is a simple one. It's probably so easy that it doesn't even warrant a tutorial, but I snapped some pictures while I was doing this and figured HEY why not.
Materials:
A pair of shoes that fit well but are showing wear along the toes. I picked my FAVORITE two-year-old glitter flats because the toes are suspiciously glitter-free from all the tripping and toe-stubbing I do throughout the day, and if I ruined them it was time for a new pair anyway.
{not pictured: foam brush, acrylic paint, and plain-'ol scotch tape} 
Step 1: 
Start by taping off the section of the toe you'd like to paint. Curve the tape a little, although straight-across would look good too. Press firmly on the tape to get it to adhere to the crazy glitter of the shoe you chose. Start rethinking your decision, but don't stop now!
Step 2: 
Squirt a little paint onto the toe part and fret a bit because it wasn't exactly the shade you were expecting. Go with it anyway. {Tip: A little goes a long way. A dab this size was able to cover both toes well}
Step 3. 
Start painting! Try to start on top of the tape and brush down, to minimize paint seepage underneath. 
DIY cap toe shoes
Step 4: 
Peel off tape carefully, while paint is still wet. Do a little happy dance, but make sure to subdue it since the paint is still wet and your husband is getting tired of finding paint on the carpet.
Tadaaaaaaa! These are still my favorite shoes, and now they've got a pop of color!  The paint has a sort of satin finish rather than gloss, so it has good contrast to the shiny-ness of the shoe. But when the sun hits it, the glitter still shows through!
diy cap toe shoes
I'm probably going to line the cap-toe with some gold paint, to give it more of a crisp edge. There was some bleeding {as you can see above}, but it's not noticeable unless you get really close, and I've got some gold paint that would match the shoe perfectly!

Yay!

Tuesday, August 28, 2012

franken-pants

Today,  I will chronicle the tale of how my DIY projects usually are born. This particular tale might get a little bit awkward... for both of us.

A while ago, I bought a pair of wide-leg white pants {on a complete whim and without trying them on} because they were 99 cents. Although they were denim-ish, they were the same size as my dress pants so I figured they'd fit fine. They were also wide leg and I was really hoping for white skinnies, but I could easily fix that with a quick straight seam and be done with it. I plunked down my buck, thrilled for finding such a steal.

...

Apparently, dress pants and jeans don't go by the same sizing rules, and these were WAY too tight in the waist/hip region. I'm talking the kind of tight that would button if you were laying down, but would strain and pop if you stood up or sat down or tried to move at all. Which kind of defeats the purpose of pants, ya know?

So, I needed to make them skinny, AND let them out to accommodate my bee-hind {ironic  much?}. It would involve some serious patchwork and the skills of McGyver or Dr. Frankenstein to pull this off. So, these "great deal pants" found a new home in the bottom of my sewing pile.

I'm trying to cope with the fact that I just told you that I have gigantor hips. Eek.
I finally got up the nerve for surgery recently. Since it had been a few months since they had been purchased, I obviously wasn't going to miss them if I destroyed them. On the flip side, if I succeeded I would have a funny story to tell.

I turned the pants inside-out and laid a pair that fit me well on top of them, marking where I'd have to sew with a piece of chalk. After checking and re-checking with a ruler to ensure the legs were even, I sewed a quick straight seam down both sides of each leg, trying them on after each leg was done.
I trimmed them 1/4" from my stitches, then sewed a zigzag stitch along the bare edges for added security.
You could either say that I was being helpful for using thread that doesn't match the fabric, or that I was being lazy for not changing it after my last project. It's up to you, but I like to think it was a conscious choice... ;)

You can't even see where the original seams end and mine begin--so it didn't really matter that I used gray thread rather than white it would be even harder to see if I had used white thread rather than gray {Or is it grey? I never know; someone help me out here!}.
To make them fit in the waist area, I made panels using the cut-off hem pieces, similar to how people used to make bell-bottoms out of skinny-jeans. I had to unpick my hip seams all the way to the bottom of the pockets and pin the salvaged cloth in place. Then, it was just a matter of sewing the pieces together {which honestly was a kind of comedy of errors involving sewing machine melt-downs, pins jabbing into hip bones, and pants falling down}
They may be patched together, but they cost me 99 cents and a half hour of sewing time, so I am okay with that. And I am kind of in love with my franken-pants.
I'm totally wearing white after Labor Day. Don't care what "they" say. 

Wednesday, July 25, 2012

jumping on the bandwagon

(Or, the main reason why thrift store employees think I'm crazy).
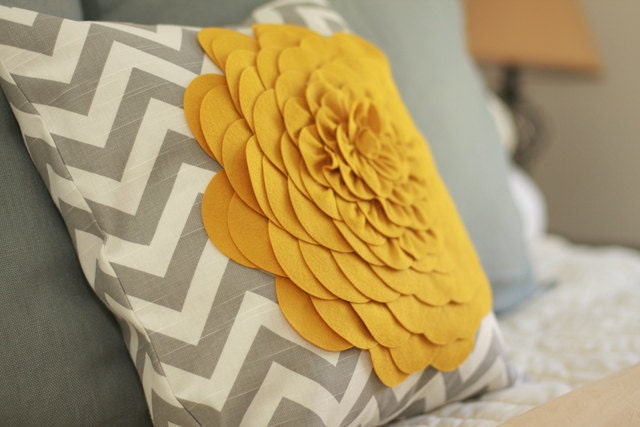
Before I get to today's project, let's take a look at the before and after, k? With a little cut and paste, this old thrift store "Little House on the Prairie" dress began its new life as throw pillows. Check it:
I'm totally stoked with how this turned out.
Judging by the sheer number of pins that pop up on pinterest daily featuring anything with a chevron print, I'm guessing I'm not the only one that digs it. And man, do I dig it. And why not?
Clearly yellow and gray are popular combinations too. But that's beside the point. The pattern is so fresh and clean, and if you leave off the flower embellishments on the pillows, it's generally gender-neutral (Which is a major requirement of Tim's when I find something I want to add to our home. Does it look girly? Is it flowery? Most of the time, if I say yes to either of those things, I get vetoed).

We wanted more pillows on our ikea couch, and I thought that chevron pillows would be perfect (and Tim approved of the pattern, so we were in business!).  But I was NOT about to fork over thirty to forty bucks APIECE.
So of course the next logical step was to make one.

I was all ready to buy some chevron fabric, when I remembered two things that gave me an idea. 1) a couple years ago I stumbled upon this blog post by Dana at Made, who used striped fabric to make chevron fabric, and 2) I had that fabulous stripe fabric in the skirt of that Goodwill dress I picked up a while back.

I was inspired, so I did it. And it worked. Here's how to do it:
Before I begin, I have to give a caveat: the stripes on the dress fabric showed up on both sides of the material. So, there wasn't really a "right" or "wrong" side. If your stripes only show up on one side, you have to follow Dana at Made's tutorial.
Once I had a rectangle wide enough, I sewed it to some solid backing and stuffed it with some cotton stuffing (I tore apart an old pillow to get both the upholstery for the backing and the stuffing. This project was "green" all the way). And that's it!

It was super simple, like sewing 101. Can you cut straight (turns out that for me, the answer to that one's no)? Can you make the machine go straight (Sometimes)? Then you can do this. And your couch will thank you for it.
Of course, you could just buy some chevron fabric (Fabric.com has some great ones for cheapish!) and make a pillow from that. Or bite the bullet and spend the 40 bucks to buy a premade chevron pillow. That'd work too.

Monday, April 9, 2012

Wheel of Fashion

Fashion has always been an interest of mine, but never a forte. When I was in Elementary school--we're talking mid-90's, so you can guess where this is going--my go-to was a giant sweatshirt I had borrowed-with-hardly-any-intention-of-returning from Mom's closet and a pair of stretch-pants. They may be called leggings now, but they were AWFUL when I chose to wear them, and I loved them. I also loved matching turtleneck and stirrup stretchpant combos as well, but I do NOT want to talk about that. I'd accompany this with a picture but Google won't even produce an image that awful. To assist your imagination, I present you a similar black-and-white version:
via US Prison Culture

Seriously.

Before I was allowed to pick my own wardrobe disasters, I had a pair of green jeans. THEY WERE THE BANE OF MY EXISTENCE. I hated them, and only wore them a couple times, but their memory stuck with me.

Recently, pictures like this started coming up all over the internet:
Bitersweet Colours // kendi everyday 

I was terrified.
 I resisted this trend for a long time (even if I secretly really liked it) because of those green jeans from Elementary School. However, I recently caved and bought a few pairs. They were on sale, so I figured I had nothing to lose :)

And, you know what? I love them this time around.

Are there any trends you're seeing out there today that were "in" when you were younger? How do you feel about it? I'm remembering jean jackets, faux fur collars, overalls, and neon, to name a few...

Monday, April 2, 2012

Neon Stone Necklace // diy


Neon is HUGE right now, and I completely LOVE it {that could be because I blessedly missed the neon-soaked 80's}. However, as much as I like to bust myself out of my wear-mostly-neutrals rut, I don't really want to go out dressed like a highlighter.

That's where accessories come in! Here are a couple I am currently drooling over:

 Kate Spade, $278 // Kendra Scott via Nordstrom, $118 // Jcrew, $150

Some more {slightly cheaper} statement pieces for inspiration:

Aida Kibur via Pink Mascara (sold out) // Ann Taylor // Pree Brulee 

So loverrly. Don't their bright colors make them look like candy?? I just want to eat them. But of course, being me, the first thing I notice are the prices. I'd never pay that much, EVUH. So, it's DIY or Die ;)

I bought this monstrosity (from JCPenney; go big or go home), and got to work. A coupla coats of primer and nailpolish later, I had this:


{it started out like this:}
The necklace arrived at my doorstep in pieces. 
Since the stones on the necklace I bought were multi-colored, I gave all the stones a once-over with some primer. My necklace was a piece of crap and the stones kept popping out {see above}, so I just took 'em all out and gave them a squirt of primer-from-a-can {I've heard of other people who paint without primer, but the stones end up being see-through and that's gross.}. 
I put the stones in their settings for picture purposes only :) I liked the primer so much I almost left them like this!
When the primer dried, I just painted each stone liberally with bright-colored nail polish {I chose a bright coralish-tangerineish color, in on-trend with the Pantone Color of the Year}. It took about two coats for the look I wanted. After the paint had set long enough to dry, I sprayed the heck out of them with spray-polyurethane. {it acts as a kind of topcoat to your nail polish. This stuff isn't going ANYWHERE.}

Afterwards, I dabbed a little bit of "never-let-go" E-6000 glue on the edges of the stones with a toothpick and stuck 'em back in.


See? Pretty easy :)

And since poorly-lit nighttime photos in my PJs don't do the color justice, here's what it looks like in natural light

Necklace: $13 
Paint: $1
Total Savings: $98-$258 (!)

Fine by me :)


TDC Before and After


Thursday, March 8, 2012

The Inevitable {and incredibly long} Awkward and Awesome Thursday Post!

First of all, how on EARTH is it only Thursday? I feel like this was the longest and slowest-moving week EVER.  Anyone else feel the same way? Yick.

I apologize in advance with how long this post is today; it's been an interesting week, to say the least. So much so that I created an EPIC and incredibly awkward banner for the occasion. Behold: 
no one's ever accused me of underdoing it...
~Awkward~
one
Scheduling an important meeting for next week... whiiiiiiiiiiiiiich happens to be spring break and therefore no one will be around {Yet another reason why this blog should have been called "whoops"}. AAAAAAnyway. Wasn't paying attention to the dates because, well, I DON'T GET IT OFF. I'll be in my office working away while the rest of campus is at play. Boo.
THAT'S how I feel about that!
two
Realizing JUST how dependent I've become on my new "roommate" (AKA new husband) to keep my head on straight. He was out of town for FIVE DAYS and I about died. Seriously. Allow me to elaborate: 1) left the house purple. 2) started the dishwasher without having put soap in it. Realizing this after I'd poured my morning coffee into a {dirty} cup. 3) was late to work two days in a row because I forgot that husband wasn't downstairs making breakfast and coffee 4) I haven't been able to sleep at ALL because of the creepy noises our house makes. Locking every door in the house doesn't make me feel better. 5) Also, the house is freezing without an extra body in it. 6) I was migraine-y on Sunday, and probably would have been better a lot sooner had I remembered to eat something. 
Thank the LORD he doesn't leave me very often {the extension of this, though, made me really appreciate him and all he does for me when he came back from his trip! }. 
illustration via my awesome powerpoint skills

three
I left my Kindle at home on Monday, so rather than enjoying my lunch and a book in the DC, I decided to sit and enjoy the sunshine by the pretty pond on campus. Of course, I had forgotten the fact that this was the first sunny afternoon in a long while and I subsequently get a itchy and blotchy sunburn across half of my body. On my way back to my office, I catch a spiderweb across my face, drop my keys into a mud puddle while brushing the web out of my eyes, break my purse strap while picking up my keys out of the mud (which subsequently resulted in the purse falling into the mud as well). Flustered, I take a shortcut off the path to get back to my office and catch my shoe on a stick, and spilling coffee all over one of my hands. I wipe it off as best as I can, and then open the door to my building at the same time as someone exits, resulting in the dumping of the other half of my coffee on my other hand. Somehow, blessedly, all of this occurs without anyone noticing. I felt like Larry, Curly, and Moe all rolled into one.
via Wikipedia
(side note, did you know they're coming out with a Three Stooges movie in April?? I just watched the trailer and it's just as slapstick-y as the old show. I can't wait.) 

~Awesome~
one

Having a successful shopping-out-on-the-town afternoon all by myself this weekend. It was a beautiful day, the sun was shining, people were happy and dressed for spring (and I swear EVERY SINGLE STORE had a window display done in either florals, pastels, or neon)! I only bought a few things after a whole day of shopping (and I will openly admit that they were all thrifted or from "Vintage" or "recycled fashion"stores), but it was completely wonderful and relaxing. Also, two new outfits for under 10 bucks? I'll take it! 

two
Successfully meeting a goal: I full-on worked out this week THREE TIMES. Whoo hoo!!! If you know me at all, you know that this is a HUGE DEAL. I work out so infrequently that a moderate-intensity hike results in dizzy spells and lightheadedness. Okay, I'll admit it, my workouts were about 1/2 hour-long and from youtube, I was so sore after each one that I had to take at least a day's break between doing another one, and husband dragged me kicking and screaming off the couch to do them, but it's a start :)
three
Leaving the good 'ol crock pot to do my work for me. Can't sing it's praises enough.
Again, awesome powerpoint skills in action.
How was your week? What do you do when you have a "just can't get your act together" week (or is it just me)?

Tuesday, March 6, 2012

The one in which I inadvertently make a knock-off // diy

 I'm wearing "new" shoes today. I'll get to the knockoff part later.
"New" of course is the operative word. I've actually had them for about five years, see?
Yikes. They've clearly seen better days. These shoes were totally out of my comfort zone when I purchased them, but I grew to love them and wore them with every stinking outfit.

Clearly they needed another lease on life--or a visit to the garbage can. Since I had nothing to lose, I thought they'd be perfect for a little fabric facelift! I brainstormed the kind of fabric I wanted to use to cover them {aka leisurely browsed pinterest for shoes I liked}, and came across these ones:
Polyvore, via Pinterest
First of all, how cute is that outfit? Anyway. Back to the shoes. I loved that although the outfit was relatively monochromatic, the pattern on the shoes made it feel less blah. So, I convinced husband to make a detour to Joann's when we were visiting some family and picked up some fabric I thought would work.


I found a couple tutorials that seemed to fit the kind of shoe I had, and settled on one by Love Meagan. Here's how I did it:

I smeared a mixture of 70:30 glue and water onto the toe of the shoe (Mod Podge would have probably been better, but I don't want to buy it).
I placed the center edge of a square of fabric onto the glued toe, making sure that the stripes were hitting at the angle I wanted.
After smoothing the wrinkles out of the toe, I painted more of the glue mixture on top of the fabric, sealing it (kind of like papier mache..?). Then I applied more glue to the sides, smoothed the fabric, painted more glue on top. Around and around, until I was almost at the back of the shoe.
I cut a slit down the fabric...

...and then trimmed around the "ankle" part, leaving about a half-inch for fold-over. I also trimmed as close to the sole as I could. Next, I worked on gluing down the heel part. I tucked a glove in the shoe to make smoothing the back part easier.
I then trimmed little folding slits around the toe, smoothing the folds as tightly as I could.
Next, I glued down the flappy parts around the top, slathered the whole thing in more of the glue mixture, and then let it dry completely. I just left it overnight
I wanted the fabric to be a little hardier and more waterproof than, you know, glue, so I sprayed some polyacrylic sealant over everything.
This stuff sprayed on a little milky, but dried clear. To be fair, I sprayed a TON of that stuff on there, so it probably doesn't always spray opaque... Either way it dried clear, so I'm fine with it.
I didn't get a picture of the back-folding process, but I just glued one side down and then folded the other edge over for a smooth seam and glued that down on top.
I have no idea if that made any sense or not... Anyway.

I wore them out and felt pretty proud of myself, but they were really.... loud? I don't know, something about the stripes and the shape didn't work as well in real life as I was hoping it would. They were cute, but they were missing something.
...meh?
So I kind of just left them in the corner of the living room until I could figure out what to do with them. Husband wasn't really all that happy with me during the week it took for inspiration to strike.

BUT WAIT! Just the other day, I saw a veeeeery similar-looking shoe show up on the oh-so-fabulous shopping blog Outblush:
J Crew via Outblush
PERFECT! Bows always make everything better. I threw together a bow from the leftover fabric, sewed 'em on, and off we went! I'm pretty thrilled with how they turned out :)

What do you think?
They're not exact, but what can you expect for accidental knockoffs?
To see how they held up over time, see this post here.
Shared here, here, here, and here

LinkWithin

Related Posts Plugin for WordPress, Blogger...