About Me Tutorials Contact Me Via Social Media! Visit Brittany's Joy Store
Showing posts with label Cook. Show all posts

Friday, October 11, 2013

recipe // thai bbq sauce

A little sneek peek to keep you reading :)
When I was in college, I spent the second half of my junior year studying abroad in Thailand. I chose Thailand for a number of reasons, but one of them was the food (also among them was "when ELSE will I have the opportunity to go there??!"). I love Thai food and could eat it every day; studying abroad there gave me the chance to do just that for a few months ;).
Of course there were many more meaningful reasons to choose Thailand, but for the purposes of this blog post, I'm sticking to food.

;)

My sweet host family at my graduation from the program, Spring 2009
When I was there, one of my host family's favorite things to do was find new things for me to try. Um, okay! They let me help out in the kitchen making meals too, which was pretty cool. After four months, I'd tried some really amazing foods. Some were delicious, some were more... adventurous.
a typical lunchtime salad at the university canteen // Stir fried vegetables and mango with sticky rice
Village food, all cooked in a banana leaf or bamboo pole // Locusts, which were horrifying but tasted like roasted pumpkin seeds
Before I left the country, I had my host family help me pick out the most authentic Thai cookbook to take back to the states with me. They picked well; I have tested it quite thoroughly :)
 

The food at most Thai restaurants and in most cookbooks originates from the southern parts of the country (Bangkok Thai), and the food I'd been eating was very much Northern Thai. While the majority of the recipes aren't exactly like what I had while I was in Thailand, they are dang close. It just takes a little tweaking for a recipe to transport me right back to the street markets.  This book got me through my Thailand withdrawals, that's for SURE.

I prepared dinner on Mother's day for my family and grandparents, right after I got back from Thailand!
My ABSOLUTE favorite food while I was there was the BBQ pork skewers you could pick up for about 30 cents at any street market. I was craving them the other day (Jordan & Elisse's honeymoon instagrams from Thailand are to blame for that!), so I pulled out the book. I was not disappointed.

Oh hello there time-traveling :)
I didn't have any pork, but the beauty of this marinade is that it plays well with really any meat (although I would definitely say that the pork is my favorite!). It's not quite the same flavor as the stuff the street vendors sell, but it's the closest I've tasted since being there. And that is something to celebrate.

 Ingredients
1 lb meat of choice, cut into ~1" strips (I used chicken, but any kind will do. Pork is the tastiest!)
Marinade:
1/4 c honey
3T ketchup
2T soy sauce
2t minced garlic
1/4t ginger
1/2t pepper (white pepper is best, but I used what I had)
pinch salt 
Wooden skewers (soaked in water at least an hour)
To serve: 
red pepper flakes, sesame seeds, and/or minced green onion

Step 1. Pour all marinade ingredients into a Tupperware container or bowl.  
 

mmmmm. Yummy!
 Mix marinade ingredients well with a spoon or basting brush.

Please excuse the upside-down image. You get the point.
Add chicken pieces, stirring well to coat each piece of meat well. I like to cover the container and give it a good shake! Refrigerate, covered, for at least an hour (the longer the better).


Step 2. Once at least an hour has passed and you are ready to cook, begin threading your meat onto presoaked wooden skewers. Try to keep them threaded as flat as possible so they will cook evenly.

 
Step 3. Grill the skewers on a foil-lined grill (for easier cleanup!) for 3 minutes or so on each side until thoroughly cooked. Keep obsessively brushing the meat with the marinade as it cooks. Arrange on a plate and sprinkle with sesame seeds/red pepper flakes/green onion and serve!


 Give it a try and tell me what you think!

Wednesday, March 20, 2013

recipe: ricotta cheese {and lasagna}

Every once in awhile, I get bit by the bug.
The domesticity bug.

Now, don't get me wrong; Tim and I cook dinner every single day and I like to think we're relatively okay cooks, but every once in awhile, we like to overachieve.

{like the day I randomly decided to make french macarons after eating them only one other time. They were delicious; I'll post the recipe sometime.}

Well, a couple months back, I spur-of-the-moment decided I wanted to try making ricotta cheese {because why the heck not?}. Ricotta is what's considered an acid cured cheese, which means it curdles/sets using some form of acid rather than rennet tablets. It was so easy and so delicious that it's now pretty much a once a month occurrence around here.

Want to try? Here's what you'll need to make about 2 cups of cheese {basic recipe adapted from Fifteen Spatulas}:

Ricotta Cheese
Ingredients:
2 cups heavy cream
3.5 cups skim milk
1tsp salt
3 tsp white wine vinegar
possible substitutions:
heavy cream : half & half for a lighter cheese; heavy whipping cream {for a sweeter cheese}
skim milk : 1%, 2% or whole milk for richer cheese
salt : seasoned salt, garlic salt, onion salt, etc.
white wine vinegar : any other vinegar! I've tried rice vinegar, red wine vinegar, even lemon juice once. If it's an acid, you're probably okay.
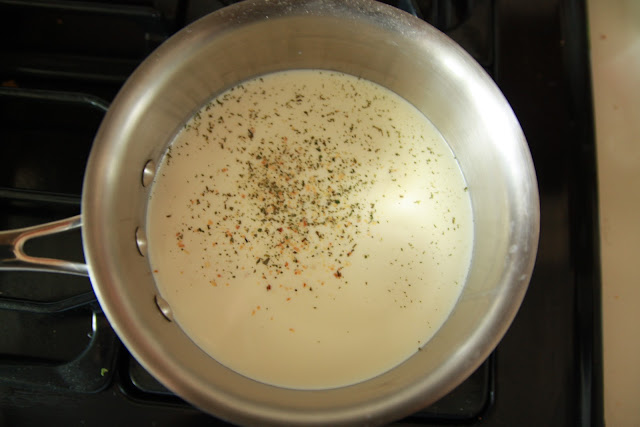
Step 1. Combine heavy cream, milk and salt in a saucepan over medium-high heat.  In this version, I used garlic salt; you can see it floating on top of the mixture below.

Step 2. Bring to a boil, stirring often.
Step 3. As soon as it starts to boil, remove from heat. Stir in your vinegar and let it sit for a few minutes (I usually wait 2-3 minutes). You will see the cheese begin to curdle along the sides of the pan.

 
 Step 4. While you're waiting, place a fine strainer or colander over a pot and line it with a wet paper towel. I use the ones from Costco and haven't torn one yet, but if you're worried you can double-up.


Pour your now-curdled cheese mixture into the strainer and let it sit for at least 20 minutes, mixing periodically to redistribute the cheese.

The longer you let it sit, the thicker it will become. I have let it drip for two hours; It's your call! It will thicken up nicely in the fridge as well. In this case, I left it for a half hour.


At this point, you can mix in fresh chopped herbs {about 3 Tbsp total; a mixture of parsley and basil is absolutely delicious}. Transfer to a container or use right away! It'll keep for about 4 days in the fridge.

What can you do with Ricotta cheese? We like it spread over bagels or toast, and it's really yummy just on chips too! Or, you can make lasagna, and bask in your domesticity.

Lasagna
Ingredients:
1 package of no-cook lasagna noodles
2 cups ricotta cheese*
2 cups mozzarella cheese
1/2 cup parmesan cheese
1 egg {in a pinch, this can be excluded}
1 large jar pasta sauce
1 lb ground meat {we used ground chicken here}
basil flakes for garnish

Step 1: Preheat oven to 400*F. Brown meat in a skillet until fully cooked. Drain, then mix in the pasta sauce with meat. In a bowl, combine egg, ricotta cheese, parmesan cheese, and 1 cup of the mozzarella cheese; mix well.
Step 2: Spread 1 cup of meat mixture on the bottom of a 9x13 pan {or 9x9 for a taller lasagna}.
Step 3: place one layer of uncooked pasta over sauce
Step 4. spread half of the cheese mixture on top of the noodles. Top the cheese with 1/3 of the meat mixture.
Step 5: repeat steps 3-4. {meat; noodles, cheese, meat, noodles, cheese, meat.}
Step 6: place one final layer of noodles on top, then spread the remaining meat mixture on top. Cover with foil and bake for an hour.
Step 7: After an hour, uncover and sprinkle with the remaining mozzarella cheese and basil flakes. Bake an additional 5 minutes or until cheese is melted and bubbly.


Remove from oven, and let stand 15 minutes before cutting and serving.


*may substitute cottage cheese for ricotta

Tuesday, March 19, 2013

playing catchup

Lots going on around these parts {although none of it has made the blogosphere! Bad blogger, I am}.

In the past few weeks, we've hiked and discovered some hidden gems of our town, crossed some things off my 25 by 25 list, hung curtains, went housesitting in a lovely home for a week, visited my parents, painted a wall, and worked my little tushie off. {not literally, although that would be nice too}. Here's a peek into what's been going on in our neck of the woods lately:


{above} I hung some fabulous no-sew curtains in the living room to go with our fabulous frosted windows {blogged about here}. We are in silly-giddy love with them. Post/tutorial coming soon!


{above} Tim and I cater-waitered a birthday party for the son of Dick Wolf, producer of Law & Order SVU. It was a big deal. When tips like that are involved, we jump at the chance work it! ;)


{above} we got to go housesitting in the lovely home of a couple from our homegroup {who are "slumming it" on a cruise ship for sixty days. Rough life, amirite?}. While we were there I of course enjoyed the jaccuzi tub and a bath bomb from Lush {this one thankfully kept me person-colored, unlike others I've tried!}

Side note. Lush: I would happily be your product tester. Hire me. Moving on.


{above} While housesitting, I also got to cross off something off my 25 before 25 list: Making french macarons! I flavored the shells with coconut extract and filled some with chocolate, some with peanut butter, and some with caramel. For my first shot, I was pretty dang proud!


{above} This one had his first EVER experience with Chick-fil-a. Shocker. This was during our housesitting week, when we were blocks away from the Mission; of course we had to take advantage and picnic there every chance we got. Tim got to work from home three of the five days we were there, so we picnicked on a weekday! {it was my spring break. Perks of working in Education}.


{above} We went on a spur-of-the-moment road trip to visit my parents. Those are the best. No agenda, just playing! We explored Alameda, spent time with my parents and grandparents, ate cake, and mentally prepared for my parents' upcoming kitchen remodel. Guess who's hosting Easter this year??? This girl!


{above} Played with paint chips for Ace's Free Paint Saturday, and settled on this moody and deliciously dark gray for our bedroom. I'm loving the patch we painted; the rest of the wall will be done tonight {hopefully...}!

Phew! Busy busy. How is it only Tuesday?? 
What have you been up to?

Friday, February 15, 2013

a bouquet for him // cook

Now that Valentine's Day is over and Tim has received his gift, I can post about it! 
Okay seriously, this was the easiest gift ever, and it was received VERY well. I mean, who doesn't love bacon? Not Tim, that's for sure.
 
Coil the bacon up in a roll and place on a foil-lined cookie sheet, fatty side down. I put mine on top of a cooling rack, so the bacon wasn't sitting in its own fat. Your choice.
Place in a 400* oven and bake for 25 minutes.
{make sure all windows are open and the fans are running. You'll set off the smoke alarms otherwise. Trust me}
You will also need a bouquet of fake flowers. While the bacon is baking, remove the heads from your flowers. You want them to look like this:
 
You'll want the stems sticking up out of the "base" pretty far, to support the weight of the bacon buds.
Once the bacon is cooked and cooled, stick them on as far as they'll go. Arrange them in a pretty vase {even though he won't notice it to save his life} and that's it!
I was so happy this turned out so well. I'm glad I didn't decide to do a dozen of these because they were gone right away. {I helped, of course; it was only fair. YUM!}. Tim was so excited I forgot to give him the card that was supposed to go with it:
What do you think? 
Would the man in your life like something like this?

LinkWithin

Related Posts Plugin for WordPress, Blogger...