As soon as Tim gets home, we're off to Las Vegas. Be back never.

Friday, July 27, 2012
Wednesday, July 25, 2012
jumping on the bandwagon
(Or, the main reason why thrift store employees think I'm crazy).
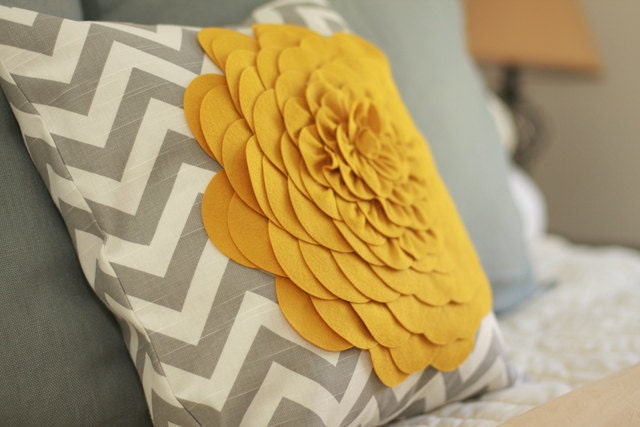
Before I get to today's project, let's take a look at the before and after, k? With a little cut and paste, this old thrift store "Little House on the Prairie" dress began its new life as throw pillows. Check it:
I'm totally stoked with how this turned out.
Judging by the sheer number of pins that pop up on pinterest daily featuring anything with a chevron print, I'm guessing I'm not the only one that digs it. And man, do I dig it. And why not?
Clearly yellow and gray are popular combinations too. But that's beside the point. The pattern is so fresh and clean, and if you leave off the flower embellishments on the pillows, it's generally gender-neutral (Which is a major requirement of Tim's when I find something I want to add to our home. Does it look girly? Is it flowery? Most of the time, if I say yes to either of those things, I get vetoed).
We wanted more pillows on our ikea couch, and I thought that chevron pillows would be perfect (and Tim approved of the pattern, so we were in business!). But I was NOT about to fork over thirty to forty bucks APIECE.
So of course the next logical step was to make one.
I was all ready to buy some chevron fabric, when I remembered two things that gave me an idea. 1) a couple years ago I stumbled upon this blog post by Dana at Made, who used striped fabric to make chevron fabric, and 2) I had that fabulous stripe fabric in the skirt of that Goodwill dress I picked up a while back.
I was inspired, so I did it. And it worked. Here's how to do it:
Before I begin, I have to give a caveat: the stripes on the dress fabric showed up on both sides of the material. So, there wasn't really a "right" or "wrong" side. If your stripes only show up on one side, you have to follow Dana at Made's tutorial.
It was super simple, like sewing 101. Can you cut straight (turns out that for me, the answer to that one's no)? Can you make the machine go straight (Sometimes)? Then you can do this. And your couch will thank you for it.
Of course, you could just buy some chevron fabric (Fabric.com has some great ones for cheapish!) and make a pillow from that. Or bite the bullet and spend the 40 bucks to buy a premade chevron pillow. That'd work too.
Before I get to today's project, let's take a look at the before and after, k? With a little cut and paste, this old thrift store "Little House on the Prairie" dress began its new life as throw pillows. Check it:
I'm totally stoked with how this turned out.
Judging by the sheer number of pins that pop up on pinterest daily featuring anything with a chevron print, I'm guessing I'm not the only one that digs it. And man, do I dig it. And why not?
Clearly yellow and gray are popular combinations too. But that's beside the point. The pattern is so fresh and clean, and if you leave off the flower embellishments on the pillows, it's generally gender-neutral (Which is a major requirement of Tim's when I find something I want to add to our home. Does it look girly? Is it flowery? Most of the time, if I say yes to either of those things, I get vetoed).
We wanted more pillows on our ikea couch, and I thought that chevron pillows would be perfect (and Tim approved of the pattern, so we were in business!). But I was NOT about to fork over thirty to forty bucks APIECE.
I was all ready to buy some chevron fabric, when I remembered two things that gave me an idea. 1) a couple years ago I stumbled upon this blog post by Dana at Made, who used striped fabric to make chevron fabric, and 2) I had that fabulous stripe fabric in the skirt of that Goodwill dress I picked up a while back.
I was inspired, so I did it. And it worked. Here's how to do it:
Before I begin, I have to give a caveat: the stripes on the dress fabric showed up on both sides of the material. So, there wasn't really a "right" or "wrong" side. If your stripes only show up on one side, you have to follow Dana at Made's tutorial.
Once I had a rectangle wide enough, I sewed it to some solid backing and stuffed it with some cotton stuffing (I tore apart an old pillow to get both the upholstery for the backing and the stuffing. This project was "green" all the way). And that's it!
Of course, you could just buy some chevron fabric (Fabric.com has some great ones for cheapish!) and make a pillow from that. Or bite the bullet and spend the 40 bucks to buy a premade chevron pillow. That'd work too.
Thursday, July 19, 2012
tennis date and quickest meal ever (not counting take-out)
This isn't that odd of a request, so I thought nothing of it.
An hour later, he walks through the door carrying the surprise he had been working on.
He had searched on Craigslist all day, met a guy and haggled with him, and came away with two tennis rackets he got for a spanking deal, because I had promised I'd teach him how to play tennis if we got ahold of rackets.
Of course, since he'd never played tennis before, there was no way for him to know:
That's totally a racketball racket.
Close enough! You can sure bet we used them anyway. For two hours, Tim got the "stuff I can remember" tennis lesson (it's been about 5 years since I've actually played) in the drizzling rain, and it was a blast.
Since we'd lost track of time, we had to throw together something quick for dinner. We got home and made the best I'm-starving-right-NOW-and-it's-sort-of-rainy meal: Tortilla soup.

This "recipe" is the easiest and one of the quickest things to whip up, aside from cereal I guess.
1 can black beans, drained
1 can diced tomatoes with juice
1/2 bag frozen vegetable medley (or whatever you've got)
1/2 container chicken broth (I use Trader Joes' and just kind of glug it in)
1TB cornstarch
Hot sauce/Cayenne pepper to taste
Salt to taste
as much shredded chicken as you want
Shredded cheese and crumbled tortilla chips to garnish
It's seriously that easy. Toss everything but the garnishes and the chicken in a pot and let it boil for a couple minutes, spoon in a bowl, add chicken, cheese, and tortilla chips, and eat it.
It takes like five minutes, no lie. And it's so worth it.
Monday, July 16, 2012
weekeend recap
This weekend was fantastic. It was the perfect combination of productivity and relaxation. And fun, interspersed with a bunch of episodes of Lost. Although that was fun too.
On Saturday, Tim's mom came through town on her way back to Arizona, so we cooked a little brunch for her and her friend.

Tim had a field day setting up a swanky little setup for our soiree (he even used our china!). Therefore, I too took some creative license with the french toast.

We also had fruit skewers and yummy quiche. Also mimosas, of course. Delish. We had the best time catching up (even though we'd seen each other the weekend before).
Once she'd left town, Tim and I got to work making use of the giant pile of frames I'd collected using Michael's 50% off coupons. Oh and all the other fun little eclectic pieces we were going to hang on our little gallery wall.
We removed the paper backing for most of the frames and started playing around with a layout, then stuck the paper onto the wall to reflect it as best we could.
Then, using Command Picture Hanging Strips, we one-by one replaced the paper with the empty frame (for most of them, we cut the strips in half, since the frames were pretty light. It's been a couple days and none of them have budged! Plus, our landlady won't have too much of an aneurysm when she sees it. At least once we tell her that they're not up there with nails).
We ran out of strips before we could finish, but since we know the layout, we can start picking the pictures we want to use.
On Saturday, Tim's mom came through town on her way back to Arizona, so we cooked a little brunch for her and her friend.

Tim had a field day setting up a swanky little setup for our soiree (he even used our china!). Therefore, I too took some creative license with the french toast.

We also had fruit skewers and yummy quiche. Also mimosas, of course. Delish. We had the best time catching up (even though we'd seen each other the weekend before).
Once she'd left town, Tim and I got to work making use of the giant pile of frames I'd collected using Michael's 50% off coupons. Oh and all the other fun little eclectic pieces we were going to hang on our little gallery wall.
We removed the paper backing for most of the frames and started playing around with a layout, then stuck the paper onto the wall to reflect it as best we could.
Then, using Command Picture Hanging Strips, we one-by one replaced the paper with the empty frame (for most of them, we cut the strips in half, since the frames were pretty light. It's been a couple days and none of them have budged! Plus, our landlady won't have too much of an aneurysm when she sees it. At least once we tell her that they're not up there with nails).
We ran out of strips before we could finish, but since we know the layout, we can start picking the pictures we want to use.
Because yep, we started a gallery wall with only a couple pictures and a buncha empty frames.
Friday, July 13, 2012
friday favorites!
It's been a while since I've done a link-up, so here goes. Here are my Friday Favorites!

Our little bird has taken it upon himself to become our home security system (Don't ask). He'll find the highest (and oftentimes the most awkward) spots in our apartment and squeak whenever someone walks by. Incessantly. Like a guard dog.
Just this morning, I found him behind the blinds hanging on for dear life to the window crossbar, squeaking away because the gardener had begun watering.

Oh man this color is yummy. It's Essie's "Apertif", and it's the perfect red. I've heard people sing the praises of Essie for a while now, but I didn't want to spend the money..... Most of my nail polish colors cost me a buck or two. BUT THEN the drugstore sale fairy sprinkled her fairy dust on this bottle and I got it for half off... WHOO!
I did ladybug toes to make it a little more appropriate for summer. Clearly I need a little more practice. Yikes.
I did ladybug toes to make it a little more appropriate for summer. Clearly I need a little more practice. Yikes.
I don't normally post e-cards, but I thought this was great. If this doesn't make sense to you, please check out this video. I cannot resist singing at the top of my lungs when this song comes on the radio.
Mom, it's country music; for your sanity, don't click through. ;)

Our little bird has taken it upon himself to become our home security system (Don't ask). He'll find the highest (and oftentimes the most awkward) spots in our apartment and squeak whenever someone walks by. Incessantly. Like a guard dog.
Just this morning, I found him behind the blinds hanging on for dear life to the window crossbar, squeaking away because the gardener had begun watering.
I have NO idea where it came from (it's probably been sitting in my makeup cabinet since I was a teenager), but I've recently rediscovered it and it's AMAZING. It's of course been discontinued, but it's an AVON (seriously, no idea how I got it) called "Country Rose" and is a perfect cross between hot pink and red. And I love it.
Luscious and yummy.
Oh, and speaking of luscious and yummy:
Ever had one? Me either. Let's go, yeah? Starbucks is giving away free tall "Refreshers" between noon and 3pm today. Go if you can. They look delicious.
Linking up with Lindsey today for Friday Favorites!

Wednesday, July 11, 2012
circular saws, popsicles, and wood glue // diy
Those three items characterized my last few days. It's been wonderful.
Although side note? Girls in lipstick don't get taken very seriously in hardware stores.
Back to the story. The guest room in our apartment has this awkward nook next to the closet that we've never really known how to use. It was the perfect size for a little end-table, but not much else, and when you're in a little-ish apartment, every little bit of space counts. However, this is what it looked like once little Spock joined our family:
(of course, he did "surprise" me by coming home for lunch when I texted him a picture of my progress... Maybe we still have a little ways to go in the trust department.)
Although side note? Girls in lipstick don't get taken very seriously in hardware stores.
Back to the story. The guest room in our apartment has this awkward nook next to the closet that we've never really known how to use. It was the perfect size for a little end-table, but not much else, and when you're in a little-ish apartment, every little bit of space counts. However, this is what it looked like once little Spock joined our family:
Yep, it's been commandeered by the bird, which we're totally okay with, but look at the "Beverly Hillbillies" setup we've got going on. To make the cage high enough, we had to stack a side table on top of another side table. It's the leaning tower of Pisa! We put up with it for three weeks, and then enough was enough. Our Printer kept getting covered in birdseed, Spock discovered he could hide in the spot between the wall and the giant stack, and, well it looks dumb.
But seriously nothing else would fit there! We'd need something a little over two feet wide, tall enough to reach the window, but not too tall as to block it. Now, we had a dresser that was the perfect height, but was a little bit too wide. It was Tim's dresser when he was a kid, and we'd been using it to store all my crafty-supplies...
...in our hallway. This was another reason I was itching to figure out a way to make this work.
It was at least 10 inches too wide, so if it were to fit into the "nook" we would have to do surgery. We figured, what the heck?
The plan was thus:
Tim was really skeptical. However, this one project would tackle both the giant tower of end-tables AND the dresser blocking part of the hallway. So it was HAPPENING.
I marked the center point on the dresser with chalk, and then again with tape so I'd know exactly where to cut. Because tape was a lot easier to see than chalk, and I was scared.
And then, it was time to cut.
MUAHHAHAHAHAHAHAHAHA!
Holy moley, there's nothing like a good power tool. AAAANDTim let me use the circular saw when he wasn't home. That's growth, man.(of course, he did "surprise" me by coming home for lunch when I texted him a picture of my progress... Maybe we still have a little ways to go in the trust department.)
TADAAAAA!
Just kidding. We still had a ways to go.

Using Gorilla Wood Glue, we attached the two dresser pieces together. When I replace the drawer struts, it will get even more support, but since it would be tucked into a small space and only would be holding a birdcage, I wasn't worried about strength.

Using Gorilla Wood Glue, we attached the two dresser pieces together. When I replace the drawer struts, it will get even more support, but since it would be tucked into a small space and only would be holding a birdcage, I wasn't worried about strength.
Then came the paint job.
It fits perfectly in the awkward nook, and you can only tell it was pieced together if you look really closely. Success! Eventually, I'll get around to surgery on the three drawers, but for the time being, we've got a burlap curtain hiding all the little things that will eventually live in those drawers. It does the trick.


Step 1 // Step 2
We finished this dresser with a paint job similar to that of our dining room table,
with a few tweaks. We knew we wanted to use color, so rather than
white-washing it, we watered down some blue paint (using a 60% water;
40% paint ratio). It only took one quick coat to get the effect we wanted, and 1/3 cup was more than enough to get the job done.

Tuesday, July 10, 2012
tray chic // diy
I LOVE me some Breakfast in bed. Except for the fact that someone's got to get up and make it, breakfast in bed is like having room service at home.
I knew when we got engaged that I wanted to register for a breakfast tray, but couldn't find one that I liked enough. I'm super indecisive. So, it didn't happen.
Months later, though, I was browsing in a vintage shop and something called my name from the shelves. It looked something like this:
It was heaven-sent. It was juust big enough to carry two plates AND two cups of coffee, which makes it the perfect breakfast-in-bed tray. It was five bucks, compared to its regular almost-40. It had legs (which I initially planned on removing, but left them on when I discovered how handy they are).
The only negative thing about it? It was so booooo-ring! I knew I definitely wanted to paint or stain it to be much darker, and probably would line the bottom with something a bit more interesting. But again, my indecisiveness decided to rear its ugly head. I couldn't make up my mind on what I wanted to do!
So I turned to Pinterest for inspiration. There were so many options! I could use almost anything:
Which one did I choose? Well, if you were around a couple months ago , you already know which one I chose:
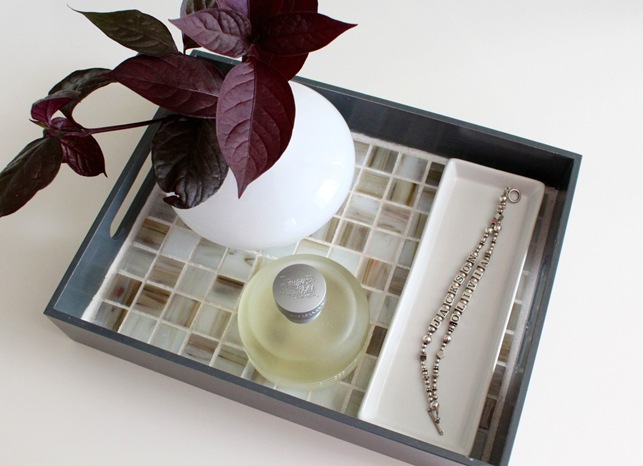
That's right, we went with backsplash tile! Easy to clean, pretty, and high-impact. It was also probably the most complicated solution, but I really really wanted it. I loved the offset pattern and the colors of this tile!
I probably should have stained/painted the tray before I laid the tile, but I was so excited. I slathered some thinset mortar along the bottom of the tray, stuck the tiles in (I got the tiles that came in a sheet--I'd have had never finished it if I had to do each tile one-by-one.), and let them dry overnight. Then, I darkened the wood using some dark wipe-on stain.
We love it. So much so that we used it during last night's Movie Night! (anyone seen the "new" Sherlock Holmes movie? We thought it was great--but then again, it was Robert Downey Jr, and you can't really go wrong with him).
I knew when we got engaged that I wanted to register for a breakfast tray, but couldn't find one that I liked enough. I'm super indecisive. So, it didn't happen.
Months later, though, I was browsing in a vintage shop and something called my name from the shelves. It looked something like this:
The only negative thing about it? It was so booooo-ring! I knew I definitely wanted to paint or stain it to be much darker, and probably would line the bottom with something a bit more interesting. But again, my indecisiveness decided to rear its ugly head. I couldn't make up my mind on what I wanted to do!
So I turned to Pinterest for inspiration. There were so many options! I could use almost anything:
Which one did I choose? Well, if you were around a couple months ago , you already know which one I chose:
That's right, we went with backsplash tile! Easy to clean, pretty, and high-impact. It was also probably the most complicated solution, but I really really wanted it. I loved the offset pattern and the colors of this tile!
I probably should have stained/painted the tray before I laid the tile, but I was so excited. I slathered some thinset mortar along the bottom of the tray, stuck the tiles in (I got the tiles that came in a sheet--I'd have had never finished it if I had to do each tile one-by-one.), and let them dry overnight. Then, I darkened the wood using some dark wipe-on stain.
And that is how it remained for a good five months.
From there, it was just a matter of mixing and applying some grout, but I just never got around to it. Until yesterday!! Since these tiles were made of glass and liable to scratching, I made sure to use non-sanded grout, which I happened to have left over from creating my custom-colored chalkboard paint.
I taped it up, smeared it on, let it dry, wiped it off, and started using it again!
We love it. So much so that we used it during last night's Movie Night! (anyone seen the "new" Sherlock Holmes movie? We thought it was great--but then again, it was Robert Downey Jr, and you can't really go wrong with him).
How would you bling out a serving tray? If I didn't have to share mine with Tim, I probably would have covered mine in glitter, but I got vetoed.
Subscribe to:
Posts (Atom)


