

Here's a little secret about my husband (a trait at which I've hinted at the end of this post): he has this annoying habit of buying pants that are too short for him. He never had this problem a few years ago when his pants length was the same as the waist measurement, but now that he's lost some weight, he mixes up those two numbers all.the.time and ends up with pants that are too short.
There isn't a whole lot I can do with jeans except take them back, but the beauty of dress pants is that they usually have an inch or so of extra fabric hidden in the cuffs. If I can't take them back (or don't have time to, like in this situation), that extra fabric means I can usually save Tim from the embarrassment of walking out of the house in floods.

Who am I kidding; he probably wouldn't even notice!

To make the alteration not look homemade, I usually echo the type of hem that most dress pants sport: a blind hem. It's a special type of stitch done at the bottom of dress pants, curtains, and the hems of some really well-made dresses where you can barely see any stitching. It looks way professional to copy this in a hem job if you can, and thankfully it's a pretty easy process once you get the hang of it!
You just need 2 things to do a blind hem properly: a blind hem foot, and a machine that does a blind hem stitch. The captions in the below photos describe both.
 |
| A blind hem looks like a straight stitch with the occasional zigzag in one direction (stitch 4 and 5). That zigzag is intended to just barely catch the fabric of the pants, which is what makes this a blind stitch. |
 |
| This is an adjustable blind hem foot. The little jutting part of metal sits at the fold of your fabric to help keep things straight. |
(you can do it without either of these things, but its a lot more
complicated. I would suggest a quick internet search if you don't have them; there are a lot of really helpful youtube clips out there).
To start, undo the original hemming on the pants with a seam ripper or a sharp pair of scissors and a careful hand. Make sure to only cut the threads holding the hem on, and not the threads that bind the raw edge of the fabric (seen below)


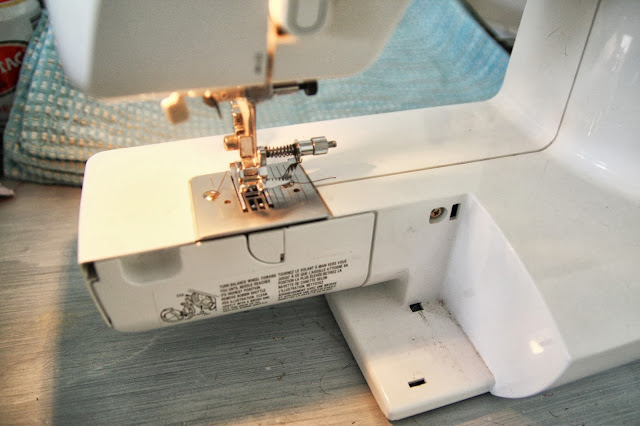
Most pant legs aren't wide enough to straddle the edge of the sewing machine, but most sewing machines can partially dismantle to allow for narrow hemming. Mine comes apart by slightly lifting up on the bottom and pulling out.

 Slip the cuff onto the machine and trap the fabric underneath the blind hem foot, making sure the piece of metal sits up against the fold of your fabric (use a test piece of fabric to see if you aren't sure your placement is correct).


Select the blind hem stitch that faces the correct way (mine needed the points facing the left), and start sewing. As you sew, because you pinned your hem with all your pins facing the same way, you can pull them out as they run up to the foot. If you don't, the pins will catch in the sewing foot and make your seam wonky, so make sure to grab them before they get sewn over.

 If the stitch is working right, you will have a series of straight stitches followed by a single zigzag jumping up and just barely catching the fold.
 When you turn the pants back right-side out, that little catch will be barely noticeable! Even less so when you iron them :). Here, you can see the original hem, plus the additional inch I was able to add. Since I used a matching thread, you can't even see it!
 I'm finding myself using this trick all.the.time to fix Tim's flood-ready dress pants. Now, I just need a way to salvage too-short jeans...!


Repeat this on both pant legs.


Thank you for this great tutorial. I just bought some new dress pants that need to be lengthened and this should do the trick!
ReplyDelete