About Me Tutorials Contact Me Via Social Media! Visit Brittany's Joy Store
Showing posts with label Pinterest. Show all posts

Tuesday, February 19, 2013

pinterest challenge: six projects in six weeks

My blogger "friend" Merrick and her sisters decided to tackle their uncompleted pinboards, and I thought I'd join in. The goal of their "Pinterest Challenge" is thus: Pick six pins, and complete them in the next six weeks! 

Now, Pinterest and I tend to have an interesting relationship. I tend to use it like Google--doing quick searches to gather inspiration for a soon-to-be-begun project. Most of the time, I will only pin things I want to remember long in the future {like baby stuff or home improvement things. Most of the home projects aren't exactly renter-friendly, and have to wait until we own a home}. BUT. That doesn't mean I haven't filed away a few projects for a rainy day on there...

After much consideration, here are the six projects {in no particular order} that I'd like to accomplish in the next six weeks:

Top:
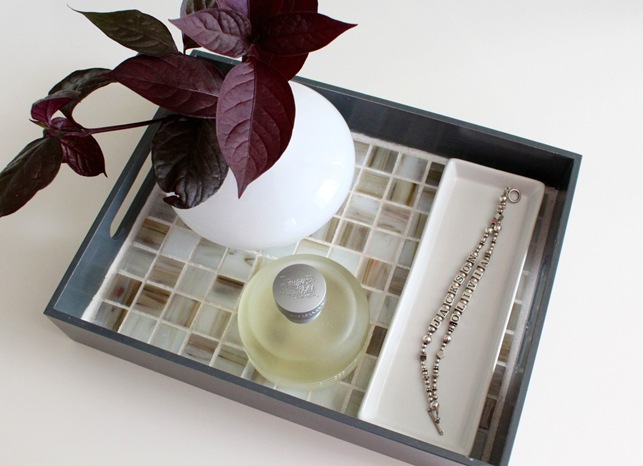
Window film via Design*Sponge {see my version here!}
Floor-length curtains framing bay window via Amanda Carver Designs
Fridge Work Station via BHG
Polka Dot Shirt via Merrick's Art
Bottom:
Framed Bunting via Landee See, Landee Do
Envelope-Back Pillow via Freshly Picked {my goal: finish half of the pillows I'll need for the Pillow Project in the next six weeks. We'll see how that goes}

Tim will be going on a few business trips during these next few weeks, so it's a perfect time to take on a few extra projects. It's a good thing I have a long list of non-husband-approved TV shows to catch up on--I do my best work accompanied by Netflix or Hulu!
Will you join the Pinterest Challenge? Whether you have a blog or not, it's a good motivator to tackle your Pinterest-inspired projects!
Sisters Share It All: Pinterest Challenge

Monday, January 7, 2013

pinterest-friendly changes // diy

Raise your hand if you love Pinterest? 

*me me me me me me!*

Some bloggers have issues with Pinterest, but it's helped drive up traffic on all of the tutorials I post, and that's always a plus in my book! If you love Pinterest too, then I've got some great news! I've made my blog 1000x more pinterest-friendly {Whoo hoo, right?}.

You may have noticed the Pinterest button that pops up when you hover over any image on this blog. Isn't that neat? This means that you can pin an image directly from my blog to pinterest {even from the main blog feed--it will pin the actual post!}. The pin description will be the title of the post, but that's easy to change to whatever you please. :)

If this is something that you would like to do to YOUR blogger-hosted blog, Blogger Sentral has a great and simple html tutorial here.

Happy Pinning!

Tuesday, July 10, 2012

tray chic // diy

I LOVE me some Breakfast in bed. Except for the fact that someone's got to get up and make it, breakfast in bed is like having room service at home.

I knew when we got engaged that I wanted to register for a breakfast tray, but couldn't find one that I liked enough. I'm super indecisive. So, it didn't happen.

Months later, though, I was browsing in a vintage shop and something called my name from the shelves. It looked something like this:
It was heaven-sent. It was juust big enough to carry two plates AND two cups of coffee, which makes it the perfect breakfast-in-bed tray. It was five bucks, compared to its regular almost-40. It had legs (which I initially planned on removing, but left them on when I discovered how handy they are).

The only negative thing about it? It was so booooo-ring! I knew I definitely wanted to paint or stain it to be much darker, and probably would line the bottom with something a bit more interesting. But again, my indecisiveness decided to rear its ugly head. I couldn't make up my mind on what I wanted to do!

So I turned to Pinterest for inspiration. There were so many options! I could use almost anything:

Fabric via Centsational Girl


Backsplash tile via just a girl


Patterned paper via eat live shop


Monogram via homeroad


Paint sticks via Sweet Charli

Which one did I choose? Well, if you were around a couple months ago , you already know which one I chose:
That's right, we went with backsplash tile! Easy to clean, pretty, and high-impact. It was also probably the most complicated solution, but I really really wanted it. I loved the offset pattern and the colors of this tile!

I probably should have stained/painted the tray before I laid the tile, but I was so excited. I slathered some thinset mortar along the bottom of the tray, stuck the tiles in (I got the tiles that came in a sheet--I'd have had never finished it if I had to do each tile one-by-one.), and let them dry overnight. Then, I darkened the wood using some dark wipe-on stain.
+ =
And that is how it remained for a good five months. 
From there, it was just a matter of mixing and applying some grout, but I just never got around to it. Until yesterday!! Since these tiles were made of glass and liable to scratching, I made sure to use non-sanded grout, which I happened to have left over from creating my custom-colored chalkboard paint
I taped it up, smeared it on, let it dry, wiped it off, and started using it again!
We love it. So much so that we used it during last night's Movie Night! (anyone seen the "new" Sherlock Holmes movie? We thought it was great--but then again, it was Robert Downey Jr, and you can't really go wrong with him).
How would you bling out a serving tray? If I didn't have to share mine with Tim, I probably would have covered mine in glitter, but I got vetoed.

Tuesday, July 3, 2012

why pinterest is good for self-esteem.

In the past three days, I've been getting emails from people telling me that one of our wedding pictures was popping up all over the wedding board on Pinterest. After the third email, I decided to check it out. Sure enough:
That's us! We froze in the wind after the ceremony and the groomsmen gave us their coats; Jessica got a shot of it.
And then, after some browsing, I found this:


Tim and I during our sunset portraits! D'aww.
And then this!


Our groomsmen struttin' their stuff.
Ego boost!! It's funny; you get compliments on your wedding day and for a few months afterwards, and it feels fantastic. But it's something else entirely to be affirmed by people you don't even know (and never will know!). Long after the wedding is over.
Have you ever been "pinned"? How did it feel?

Friday, March 23, 2012

Lace Inspiration--and I need your input!

I love lace. It's the best. So when husband gave me free reign in the fabric store, I ran immediately to the lace section. Sure, most of it looked like it belonged on a bridal veil or in a Quensenara dress {nothing wrong with that, of course; it's just not what I'm going for}, but I was able to find some fabulous bolts.

{Which I'm keeping secret until I've finished my projects. But one's silver and the other's black, and they're both delicious. Ohmagoodness}

I'm already hard at work on a project with the silver hunk of lacy-goodness I snagged, but I've got big plans for the second roll of black fabric: 
Confidential via Shabby Apple  //  Alice via Shabby Apple
Malt Shop via Shabby Apple  //  Love me Do via Shabby Apple

 BCBG via Bloomingdales  //  Diane Von Furstenberg via Bloomingdales 

We'll see how this goes. The lady at the fabric store bestowed upon me a sewing-project pearl of wisdom: "Sewing projects always turn out well; they just might not be exactly what you planned in the beginning". So there's that!

But anyway, here's where you come in! I canNOT decide which style I like better! Help me out; which dress should I mimic? (you can pick more than one!) Keep in mind that my lace fabric is black.
With the lace I don't use for the dress, I'm thinking of something like these:

via Gap (similar via Urban Outfitters) // via de.dawanda

The shorts are highly unlikely, but the scarf is a definite possibility. I've had my eye on that one for months. 

Happy voting, friends!
Shared here,

Friday, February 17, 2012

Pinspired: {Low-Cal} Mini Spinach & Artichoke Breadbowls

A few weeks ago, I came across this picture on Pinterest:
Picky Palate via Pinterest
It got me thinking. What is the first thing that pops into your mind when you think of spinach dip? Sour creeeeeeeeeeeeeeam. Artichoke dip? Mayooooooooooooooooooo.

Pretty gross, right?

Well, I LOVE dip, and don't think that calories and fat should keep us apart.

...

Clearly I need to find a way to lighten up some of my faves.

I absolutely LOVED the idea of putting the dip in mini-breadbowls, so I used refrigerated pie crusts.  The husband loved them with the pie crust, but I think next time I'll try using tortillas pressed into the muffin cups. They'd crisp up like chips and let the dip stand out.

Here's my recipe (very loosely inspired by the Picky Palate one)

Ingredients:
  • 1 1/2c frozen spinach, thawed, OR ~2c fresh spinach
  • 1 can (or about 8 oz) Artichoke hearts, drained, VERY finely chopped. 
  • 1/2c light Mayo
  • 1/3c Plain Greek Yogurt
  • 2 cloves garlic, chopped.
  • 1/3c Parmesan Cheese * 
  • Refrigerated Pie Crust, Bread Dough, Tortillas, etc. (whatever you want to be your "bowl")
You'll also need:
  • Mini-Muffin Tin
  • Cooking Spray
*I didn't have this but would DEFINITELY use it next time!
Directions:
  • Preheat the oven to 400 degrees. 
  • Mix together all the ingredients in a bowl. Complicated, I know. Savor the fact that your tummy and your waistline will thank you for being so kind to them. (if you use fresh spinach, you'll need to steam it first; stick it in the microwave for like 30s with a 1/2 tsp of water. )
  • Spray the muffin tins with cooking spray. Press the bread bowl material (pie crust, bread dough, tortillas, etc) into each muffin tin, making sure to make it thin. I love my carbs but you want the dip to be the shining ingredient here!
  • Scoop the dip (a little more than 1Tbsp) into each cup, making sure to fill it a teensy bit extra-full (it will compact a little when baked). 

  • Reduce the heat to 350 degrees, bake for 15 minutes or until the tops are lightly browned.
Perfection! I had some leftover dip, so I tossed it in a ramekin to bake sans-breadbowl. Delicious both ways! 
I may or may not have had this for dinner. It's a vegetable, right?
YUM!

Pin It


Linking up here!

Wednesday, February 15, 2012

Pinspiration: Bow Ring

Since yesterday was Valentine's day, I think it's time to post about a cutesy project.  

When the husband and I were looking around for wedding bands, we peeked into Tiffany's (It's fun to dream), and my eyes were drawn to this particular lovely:
via Tiffany


Whimsical and dainty, it was absolutely adorable and reminded me of those "Don't Forget!" strings I would tie around my finger when I was in Elementary School. The saleslady let me try it on, bless her, and I filed it away in my "someday" file. I completely forgot about it until I ran across this picture on Pinterest:
Pinterest via muyinmolly
It was perfect, and so simple. I had some experience with wire art for my wedding (you can see a peek of one of my creations in my photobook post here!), so I thought: I could totally make that. 

via Callaloo Soup, formerly on Etsy
I did some research online on Etsy and Google to see what other techniques could be used to make a bow ring, and found a bunch of ideas:

via wirewrap
via Sheek Inc

Clearly I'm not the first to try this myself. It took quite a few tries, and the first few were REALLY wonky. But I just switched on The Bachelorette and started playing with the wire until I got the shape and size right. Ultimately, though, I'm pretty pleased with the result.

It's a little bigger, and it's a lot less precise (easier to see the technique on mine than the inspiration), but I'm pretty happy with it.

I hope you all have a wonderful Wednesday!!

Pin It


</p><p>http://www.thethriftyhome.comPhotobucket and here

LinkWithin

Related Posts Plugin for WordPress, Blogger...